Friday, September 30, 2016

Can You Cure Runner’s Knee? [Part 2]

best exercises for runner's knee

This is the second part of four in my series on Runner’s Knee. If you’re new here, be sure to start with Part 1: Load Management.

Last week, we gave you the first in our four part series of how best to manage Runner;s Knee. I hope you found the blog on load management interesting and informative.

This week, I want to discuss the most recommended treatment not just for runner’s knee, but for all musculoskeletal injury: exercise-based rehab.

I am going to declare my bias early: I am a passionate physiotherapist, exercise is a core skill of my profession and there is robust evidence that it is an effective tool in helping patients get better. However, it is no panacea and we must strive to do better with it and understand more about it.

We have high-quality evidence that exercise is effective in managing Runner’s Knee for both short and long term. However, it does not help everyone, and surely not all patients need the same program. So, what could we be doing better?

Firstly, let’s look at the evidence. What we know for sure is that we need to focus on more than just the quads. We now have two Level 1 pieces of evidence that suggest a mixed bag of hip- and knee-based exercises are the most efficient way to treat knee pain for some runners.

First, the good news: In both of these studies, participants pain went down and their function improved.  The not so good news: Both of these studies used different exercise programs. So what should you do? Does it matter? 

Picking the best exercises for runner’s knee

In my professional opinion, choosing the best exercises for Runner’s Knee for a given individual all comes down to specificity. Take this paper:

screen-shot-2016-09-24-at-9-36-42-am

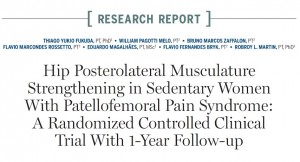
This paper looks at women with specific hip weaknesses, who were given a strength-based program. A specific intervention targeting a specific deficit led to a successful outcome. This should translate to specific exercise programs for specific patients. As my close friend and colleague Simon Lack says:

“We should not be prescribing exercises to our patients, we should be prescribing exercise to our patient”

I know this is difficult information to present in an article like this, offering general advice, but I’m going to try!

For the average runner, a program should start with a neuromuscular activation phase. This translates to low load, high sets and reps, regular (up to daily) completion and small, specific movements. This should allow for reasonably pain-free exercise, improvement in the “brain-body” connection and increased confidence for the patient.

The next phase to tackle would be what is known as strength endurance. As your symptoms improve, load should go up, sets and reps should reduce and completion should drop (up to 4-5 times per week). Running is an endurance activity. The progression in load will give our tissues the capacity to tolerate an impending return to running.

For some, that will be where the ceiling lies. However, if further progression were required, then a pure strength phase would come next. Further increases in load coupled with lower sets/reps and weekly completion.

Lastly, we would have power (moving loads at speed), but unless you are a sprint athlete, this is rarely required for rehabilitation purposes.

FREE DOWNLOAD: Runner’s Knee Rehab Resources [PDF]

Take home messages

  1. Exercise based rehab works – in some cases better than others.
  2. We (physios in general) could be doing better with how we prescribe corrective exercises.
  3. Think beyond the quads. When considering the best exercises for Runner’s Knee, make sure you work the glutes!
  4. Specificity is key – every case is unique!

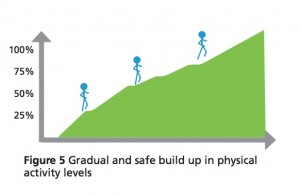
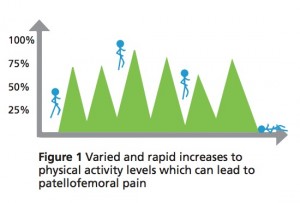
As always, progress gradually, listen to your body and if in doubt, seek the advice of a professional!

The post Can You Cure Runner’s Knee? [Part 2] appeared first on Run Coaching, Ironman and Triathlon Specialists - Kinetic Revolution.


from Run Coaching, Ironman and Triathlon Specialists – Kinetic Revolution http://www.kinetic-revolution.com/best-exercises-for-runners-knee/

Scottsdale Sports Medicine

Saturday, September 24, 2016

@MarilynKaminski


Scottsdale Sports Medicine

@MarilynKaminski


Scottsdale Sports Medicine

@MarilynKaminski


Scottsdale Sports Medicine

Can You Cure Runner’s Knee [Part 1]

Can You Cure Runner's Knee

While individual cases of runner’s knee need to be treated at face value, with no one-size-fits-all cure, there are a few key areas that I consider when managing running patients with pain at the front of their knee. These factors are important in understanding how to cure runner’s knee:

  1. Load Management
  2. Rehabilitation (Exercise)
  3. Running Retraining
  4. Therapeutic Adjuncts

How to Cure Runner’s Knee – Load Management

I am going to write a four-part series on the topic of how to cure runner’s knee, firstly focusing on load management…

But what does ‘load management’ actually mean?

In short, it relates to controlling the amount of load (exercise) you subject your body to, both in terms of total running volume and increases/decreases. To keep it simple, think about it as avoiding doing too much, too soon.

This is a clear message from the excellent patent information leaflet produced by my good friends & colleagues Dr. Christian Barton (Melbourne, Australia) and Dr. Michael Rathleff (Aalborg, Denmark), best summarised by these two images.

Learn how to cure runner's knee - Figure 5 Gradual and safe build up in physical activity levelsLearn how to cure runner's knee - Gradual and safe build up in physical activity levels

It must be stressed that load is a good thing for the human body. We are remarkably adaptable creatures, and the correct amount of load will lead to positive adaptation within the tissues.

Load too little, you will not adapt. Load excessively, you may break down. I personally like the term “zone of optimal stress” to describe the middle ground which will provide a training effect without breakdown and injury.

So how can we make this a measurable target for the average runner?

Although it will be individual to every athlete and may vary in each training cycle, there are some guidelines that apply to most runners.

The first target to present is 20%.

This comes from an excellent paper from Scandinavia, looking at the risk of running injury with varied training progressions. Those who increase their training volume by 30% each week are more at risk of injury than those who progress by 10%. This tells me that the “average” safe zone for a typical runner lies on or around the 20% progression mark.

View this as an individual run variable as well as a weekly volume variable.

For example, if your longest run in a week was 10 miles, it should not exceed 12 miles the following week. If your weekly volume was 30 miles, it should not exceed 36 miles the following week. Use this for decreasing volume as well.

The human body likes consistency as well as variability and always remember that your tissues adapt to the loads that you place on them. So while gradual progression is important, so is a gradual approach to reducing training loads.

Remember that this is generic advice, and will need to be tweaked for every runner and every training cycle.

If you make a progression and your body complains, do not be afraid to strip things back a little. Conversely, if you feel as though you are capable of more, push your boundaries with a degree of caution.

If you are recovering from an injury, you should experience a maximum of 4/10 pain during a run, which should have cleared by the next morning. If this is not the case, you may be pushing yourself too hard.

FREE DOWNLOAD: Runner’s Knee Rehab Resources [PDF]

The other guidance we can offer comes from the excellent new paper from the British Journal of Sports Medicine, by Sports Scientist Tim Gabbett.

This paper describes something called a “chronic workload ratio”, with sudden spikes in acute workload shown to cause more injury than chronic workloads.

Here’s what that means:

If you are a marathon runner, your chronic workload would be your typical base endurance volume (long, steady runs). This volume alone does not necessarily increase your risk of injury. However, let’s say you choose to enter a 5KM and start to do lots of speed work. This would be a spike in your acute workload, which was found to increase your risk of injury.

The key message here is to consider your training zones (steady state, threshold, tempo, tolerance) as variables to apply the 20% training rule to, not just the sheer amount of training that you do.

Summary

Training progressions are a good thing. The human body is a robust organism, often capable of more than we think. However, push it too far and it may bite back, often in the form of injury or a slower recovery from a current injury.

Progress gradually, listen to your body and if in doubt, seek the advice on how to cure runner’s knee from a professional such as a running specialist physiotherapist!

share-facebookshare-twitter

The post Can You Cure Runner’s Knee [Part 1] appeared first on Run Coaching, Ironman and Triathlon Specialists - Kinetic Revolution.


from Run Coaching, Ironman and Triathlon Specialists – Kinetic Revolution http://www.kinetic-revolution.com/can-you-cure-runners-knee-part-1/

Scottsdale Sports Medicine

Friday, September 23, 2016

@MarilynKaminski


Scottsdale Sports Medicine

@MarilynKaminski


Scottsdale Sports Medicine

@MarilynKaminski


Scottsdale Sports Medicine

Wednesday, September 21, 2016

Three Adductor Strength Exercises for Runners


In this video I show you some simple but effective inner thigh exercises to build strength in the adductors and groin region. These exercises are great for anybody who has suffered a groin strain or adductor injury.

The adductor muscles of the inner thigh are an important muscle group for us runners to strengthen. Frequently this is an area of particular weakness and tightness, and unfortunately sometimes injury.

A few months ago I uploaded a video showing my favourite adductor mobility drill. However today I want to focus on building strength in your adductor muscles, helping you build a stronger inner thigh and groin.

I try to keep the equipment requirements very light with these exercises! All you need is:

Sunday, September 18, 2016

@MarilynKaminski


Scottsdale Sports Medicine

@MarilynKaminski


Scottsdale Sports Medicine

@MarilynKaminski


Scottsdale Sports Medicine

Saturday, September 17, 2016

Returning to Exercise after Childbirth [Part 2]

Returning to exercise after childbirth

Part 2: Getting Started

This is the second part of two in my series on returning to training after childbirth. If you’re new here, be sure to start with Part 1: Your Changing Body.

First things first: It is important to consult your midwife or doctor if you have any questions and to never attempt anything that causes pain.

Vigorous exercise should be avoided until bleeding has stopped and you have had a 6-8 week post-natal check by midwife or doctor.

All timescales used in this post are to be viewed as a guide only, some people may need longer recovery time than others.

Key Information

  • Don’t expect to be able to rush straight back into your pre-pregnancy exercise regime
  • Wait until you have had a 6-8 week postnatal check-up before starting more vigorous exercise
  • If you had a caesarian delivery it is advisable to wait 12 weeks before vigorous exercise
  • Wear a good supporting bra to protect the breasts when exercising
  • If you are breastfeeding, feed before exercising
  • Drink plenty of fluids
  • Ensure you eat 1-2 hours before exercise
  • Listen to your body and rest if you are feeling especially tired
  • Stop immediately if you feel pain
  • Abdominal crunches and sit-ups are NOT necessary and are NOT advised
  • Make sure you are working the correct areas, check you are feeling it in the appropriate muscles and pay attention to technique. The key is in the detail!

Stage 1: Immediately After Birth

Core Exercises:

Deep breathing. As you inhale, your pelvic floor should relax as your rib cage lifts and diaphragm contracts. As you exhale, your rib cage lowers and flattens as your pelvic floor tightens. Make sure your pelvic floor coordinates with your diaphragm which will take concentration and practice at first!

Deep breathing is often overlooked, but it is important for both your pelvic floor and abdominal muscle function. Try three sets of 10 breaths 5-7 times weekly.

Cardiovascular Exercise:

Depending on the type of delivery you had and how much discomfort you are experiencing, gentle walking is okay in the first week or so after birth.

Start relatively slowly and gently. Once you feel able, start short, gentle walks for 10-15 minutes every day — but don’t do anything too strenuous until the lochia has stopped. Stop if you experience discomfort.

In the early days, more than 10-15 minutes of walking may make you feel quite uncomfortable and ‘heavy’ in the pelvic floor area. Take it slow and steady!

Stage 2: At Least 2 – 3 Weeks After Birth

Core Exercises:

Deadbug regression (legs only). The key is to avoid letting your back arch off the mat, so maintain a flat back.

Timing of breathing is crucial here, inhale to prepare then slowly exhale and flatten your rib cage as you extend your leg.

Inhale as you bring your leg back into your chest. Try to draw up the pelvic floor as you exhale. Movements should be slow and controlled, focused on timing.

Start by performing 8-10 reps 2-3 times and build up as you gain strength. If you cannot keep your back flat with a full leg extension then reduce the range of movement.

Cardiovascular Exercise:

As the swelling and bruising start to reduce, the uterus contracts back down and lochia stops, you’ll be able to walk longer and faster. Think about good posture.

If you’re walking with your baby, make sure the buggy handle is appropriate height so you are not stooping or bending forwards. Too vigorous of exercise too early may cause more bleeding so take it slowly and steady to start.

Stage 3: At Least 6 – 8 Weeks After Birth, 12 Weeks if c-section

After your post-natal check as long as you feel OK and your doctor has given the go ahead, you can start thinking about returning to your old activities and classes. If you are attending a fitness class or bootcamp, inform the fitness instructor that you are post-natal, take it easy and gradually build up to joining in with everything.

But wait: Contact your midwife if the gap in your abdominal muscles is wider than two centimeters after eight weeks and do not return to old activities or do crunches or planks.

Core Exercises:

Deadbugs, as before and add in the arms when you can do 3-4 sets of 10 on each side.

90-90 hip lift. Really focus on timing of breathing as with the deadbugs. Imagine you are blowing up a balloon as you slowly exhale and gently lift your tailbone off the floor.

You should feel it in your tummy muscles — if you don’t then you are not doing it right! Progress to adding a wedge or foam roller between your thighs.

Mobility Work:

Focus on some gentle dynamic stretches to work on improving posture due to pregnancy and post-natal related changes.

Pregnancy tends to tighten and weaken hip flexors which, combined with poor abdominal muscle control, exaggerate a lower back arch. That means prolonged sitting for feeding the baby may cause your upper back (thoracic spine) and shoulders to tighten up.

Strength Work:

Gym-based work, such as squats and lunges, are fine to start up again, however, begin with bodyweight exercises before adding weights — unless you have been weight training throughout pregnancy. Focus on correct form and technique. Stop if you experience pain.

Continue to work hard on core strength continuing with deadbugs and the hip lifts. Start to add in more challenging exercises like side planks and planks as long as your midline separation is not greater than two centimeters.

If you experience midline abdominal bulging or ‘doming,’ then stop exercises and seek medical advice. Many post-natal women should focus on strengthening their glutes and the adductors. Always ensure an adequate dynamic warm up and use this as an opportunity to work on mobility.

Cardiovascular Exercise:

If you decide to start running, then start slowly and build up gradually. Initially, try a very short gentle run of only 5-10 minutes. Consider a run-walk program such as the free Return to Running Programme from James Dunne here at Kinetic Revolution.

Run-specific strength and mobility work is also likely to be beneficial to help minimize the risk of injury — especially in those first few months after birth when glutes tend to be weak and hip flexors tight.

Good luck with your return to exercise in this new phase of your life. Give it time, there’s no need to rush the process!

The post Returning to Exercise after Childbirth [Part 2] appeared first on Run Coaching, Ironman and Triathlon Specialists - Kinetic Revolution.


from Run Coaching, Ironman and Triathlon Specialists – Kinetic Revolution http://www.kinetic-revolution.com/returning-to-exercise-after-childbirth-part-2/

Scottsdale Sports Medicine

Friday, September 16, 2016

@MarilynKaminski


Scottsdale Sports Medicine

@MarilynKaminski


Scottsdale Sports Medicine

@MarilynKaminski


Scottsdale Sports Medicine

Tuesday, September 13, 2016

Returning to Exercise after Childbirth

Returning to exercise after childbirth

Part 1: Your Changing Body

Just two years after having her son, Jessica Ennis Hill won a silver medal in the Rio Olympics in the heptathlon.

Those of us who have had children can relate to just how hard her comeback must have been and what an amazing achievement it is in such a short space of time.

For many women, making a post-natal comeback to exercise is a daunting prospect, however it can be extremely rewarding, both physically and mentally. It allows quality time to yourself, improving mood and energy levels as well as helping to get rid of pregnancy weight gain.

It also regains muscle strength, mobility, posture and cardiovascular fitness. It’s important to remember however that you cannot just jump straight back into your pre-pregnancy exercise regime and there are a few important things to consider:

It is NORMAL to have a ‘saggy’ looking stretched tummy for the first few months after giving birth, do not expect it to suddenly snap back into shape and do not put extra pressure on yourself by setting unrealistic goals – enjoy being a mum too!

Effects of relaxin on the body

During pregnancy your body produces a hormone called relaxin which causes ligaments to become more elastic, allowing the pelvis to accommodate the growing baby and to help the pelvic floor and abdominal muscles stretch during birth. Although relaxin is no longer produced after birth, the effects of relaxin on the ligaments and joints may persist into the post-natal period.

The exact length of time the effects persist is unknown and appears to vary but is thought to be around four to six months. This may cause joint pain during high impact exercise, especially in the knees, hips and back. Be sure to not over-stretch during this period, especially.

Your oestrogen levels also decrease after childbirth and when breastfeeding. Oestrogen has a protective effect on joints and bones so during times of decreased oestrogen, such as when breastfeeding or during the menopause, women may experience joint pain, especially in the hips and knees when exercising, particularly during high impact sports like running.

These hormonal changes appear to affect some women more than others and do not necessarily mean high impact activities like running should be avoided in the first six months after birth. Make sure you’ve done the appropriate strength work to build up your muscles so they can help support the joints. If you experience any knee or hip pain, consider other lower impact activities.

Abdominal muscles during pregnancy

The rectus abdominis muscles (six-pack) which run in two parallel lines up your, tummy stretch and lengthen during pregnancy. Rectus abdominis separation (or diastase recti) occurs as the two bands of muscle which used to lie parallel stretch away from the midline to make more space for the growing uterus.

This separation is normal in pregnancy, however, in the post-natal period, we want to encourage the ‘gap’ to reduce and the muscles to shorten and strengthen again in order to regain full function of the abdominal muscles and a flat tummy.

Crunches and planks can make the separation worse so AVOID them at least in the initial post-natal period, crunches are definitely NOT required for a flat stomach or good abdominal muscle strength.

Three to four days after birth, your muscles will begin to realign and the wide separation will reduce. In most cases, by eight weeks, the gap has reduced to 2cm or less. Gentle exercises like pelvic tilts and leg slides can begin immediately after birth and will help to reduce the abdominal separation.

The rectus abdominis muscles (‘6 pack’) which run in two parallel lines up your, tummy stretch and lengthen during pregnancy. Rectus abdominis separation (or diastase recti) occurs as the two bands of muscle which used to lie parallel stretch away form the midline to make more space for the growing uterus.

Breastfeeding & Exercise

If you are breastfeeding then ensure you have an adequately supportive and well-fitting sports bra. For comfort, feed from both sides before exercise, especially if you are doing vigorous or high impact exercise.

Moderate exercise does NOT affect milk production, nutrient composition or baby weight gain. Ensure you are adequately hydrated by drinking plenty of water and ensure your diet is balanced and contains adequate protein.

Oats have anecdotally been thought to increase milk supply although there is no scientific evidence to support this.

A woman who is breastfeeding exclusively requires about 200-300 extra calories per day. Although there are no known harmful effects of lactic acid in milk, it may be present in breast milk when mums are exercising to the point of exhaustion.

If your baby seems reluctant to feed after a particularly high-intensity session then this may be something to consider, although showering to remove salty tasting sweat may also help.

Rest & Sleep

Rest is important too. Try and sleep or rest when the baby does. Although exercise can help improve mood and boost energy levels, don’t over do it. Make sure you have a minimum of two rest days a week to let your body recover.

If you feel exhausted or have been up all night then do not feel guilty about allowing yourself a rest or limiting your exercise to stretches or yoga.

I do hope you find these guidelines helpful. I’ll be writing a follow-up article in a few weeks, describing the step-by-step process for safely returning to full exercise after childbirth :)

The post Returning to Exercise after Childbirth appeared first on Run Coaching, Ironman and Triathlon Specialists - Kinetic Revolution.


from Run Coaching, Ironman and Triathlon Specialists – Kinetic Revolution http://www.kinetic-revolution.com/returning-to-exercise-after-childbirth/

Scottsdale Sports Medicine

@MarilynKaminski


Scottsdale Sports Medicine

Monday, September 12, 2016

@MarilynKaminski


Scottsdale Sports Medicine

@MarilynKaminski


Scottsdale Sports Medicine

@MarilynKaminski


Scottsdale Sports Medicine

Sunday, September 11, 2016

@MarilynKaminski


Scottsdale Sports Medicine

@MarilynKaminski


Scottsdale Sports Medicine

@MarilynKaminski


Scottsdale Sports Medicine

@MarilynKaminski


Scottsdale Sports Medicine

Thursday, September 8, 2016

Iliotibial Band Syndrome: Prevention is Better than Cure

Iliotibial Band Syndrome (ITBS) is one of the most common and debilitating injuries that runners can suffer.

Why does this issue seem so difficult to fix? And once fixed, why does it seem to come back again so quickly?

FREE DOWNLOAD: Runner’s Knee Rehab Resources [PDF]

Traditional treatments don’t work

Read most magazines and the recommended approach is massage and foam rolling. Unfortunately, because the ITB is essentially a tendon, it doesn’t have great blood flow. Tendons are not supposed to be stretched or elongated like muscles so there is little value in treatments like massage and foam rolling. (But there is one way that foam rolling can help.)

Drugs can delay healing

Anti-inflammatory treatments, whether in the form of icing or drugs like ibuprofen, may reduce the pain but they won’t help you recover. Inflammation is our bodies ways of marshalling resources to fix a problem. Taking the inflammation away can actually slow recovery.

Time heals all wounds

The pain of ITBS comes from irritation of the fat pad located around the outside of the knee. That means that time plays an important part in recovery. By giving the aggravated area a break, most people find pain disappears completely and that they can resume running within six weeks.

Tip: Eat fewer inflammatory foods (think dairy, sugar and alcohol) so that your body can focus on the injury rather than fighting additional inflammation.

Fix the cause, not the symptom

Not running for a period of time may fix the problem, but won’t stop it from coming back. In order to prevent ITBS, you first need to understand what the ITB is responsible for in your body. In combination with a few important muscles, the ITB is responsible for providing lateral stability and making sure our knee moves in a straight line rather than “dropping in” when running (and cycling).

The trick lies in those muscles that help the ITB – the Gluteus Medius and the Tensor Fasciae Latae.

By activating and strengthening these muscles, the ITB can do its job without causing you pain. Exercises such as lateral leg raises are great exercises for strengthening these muscles but do little to control how they activates as part of the running movement.

Try this instead: Three single leg squat variations:

Regular practice is key with these exercises, as you’re teaching your body a behavior it will rely on next time you lace up your running shoes.

References

Fredericson, M., & Wolf, C. (2005). Iliotibial band syndrome in runners: Innovations in treatment. Sports medicine (Auckland, N.Z.)., 35(5), 451–9.

Noehren, B., Schmitz, A., Hempel, R., Westlake, C., & Black, W. (2014). Assessment of strength, flexibility, and running mechanics in men with iliotibial band syndrome. The Journal of orthopaedic and sports physical therapy., 44(3), 217–22. Retrieved from


The post Iliotibial Band Syndrome: Prevention is Better than Cure appeared first on Run Coaching, Ironman and Triathlon Specialists - Kinetic Revolution.


from Run Coaching, Ironman and Triathlon Specialists – Kinetic Revolution http://www.kinetic-revolution.com/iliotibial-band-syndrome-prevention-is-better-than-cure/

Scottsdale Sports Medicine